Handwritten Note Editor
Draw diagrams, sketch concepts, and write naturally using the digital canvas
The handwritten note editor gives you a digital canvas for drawing, sketching, and writing by hand. Whether you're creating diagrams, visualizing concepts, or simply prefer writing to typing, this tool brings the benefits of handwriting to your digital study notes.
Why Handwritten Notes?
Research consistently shows that handwriting (compared to typing) improves learning:
Better Retention
The motor activity of writing by hand activates more areas of your brain, leading to stronger memory formation.
Visual Learning
Drawing diagrams, mind maps, and sketches creates visual memory cues that make recall easier.
Flexible Expression
Handwriting lets you easily combine text, drawings, arrows, and symbols in ways that typed notes can't match.
Natural Feel
For many learners, handwriting feels more natural and engaging than typing, leading to deeper focus.
Don't worry if your handwriting or drawings aren't perfect! The act of creating them is what matters for learning, not how pretty they look.
Creating a Handwritten Note
To create a new handwritten note:
Open your study note and navigate to the Reading tab.
Long-press on the text you want to annotate. A context menu will appear.
From the context menu, tap "Handwritten Note". The drawing canvas opens.
Use your finger, stylus, or Apple Pencil to write or draw your annotation.
Select pen colors, adjust thickness, add shapes, or erase as needed (see tools below).
Tap "Save" or "Done" when finished. Your handwritten note appears inline in the Reading tab, linked to the text you selected.
The Drawing Canvas
The handwritten note editor provides:
Drawing Area
A fixed-size canvas optimized for note-taking and diagrams. The canvas is sized similar to an A4 page for comfortable writing.
Touch/Stylus Support
Works with:
- Finger — Basic drawing on any device
- Stylus — Pressure-sensitive drawing for more natural strokes
- Apple Pencil — Pressure sensitivity support on iPad
- S Pen — Pressure sensitivity support on Samsung devices
Multi-Page Support
Create multiple pages within a single handwritten note to organize complex concepts or longer explanations.
Manual Save
When you're done drawing, tap the Save button to preserve your work. Your handwritten note is then saved and appears inline in the Reading tab.
Drawing Tools
Pen Tools
Choose from different pen types for natural writing and drawing:
Fountain Pen:
- Pressure-sensitive for varied line thickness
- Smooth, flowing strokes
- Best for expressive writing
Ballpoint Pen:
- Consistent line thickness
- Clean, uniform strokes
- Best for precise diagrams
Pencil:
- Pressure-sensitive with softer appearance
- Natural sketching feel
- Best for rough drafts and sketches
Settings for all pens:
- Color — Choose from a palette of colors
- Thickness — Adjust stroke width (fine, medium, thick, very thick)
Use different colors to differentiate between concepts, stages in a process, or types of information. For example, use blue for processes, red for important terms, and green for examples.
Highlighter Tool
A semi-transparent marker perfect for emphasizing areas without obscuring them.
Best for:
- Highlighting key terms
- Marking important areas
- Creating backgrounds or regions
Eraser Tool
Remove strokes you don't want. Tap any stroke with the eraser to remove it completely.
The eraser removes entire strokes at once. If you need to fix a small part of a drawing, consider redrawing that section instead of erasing.
Color Palette
Choose from a variety of colors:
Pre-set Colors
Quick access to commonly used colors:
- Black — Default for text and outlines
- Blue — Processes, flows, water
- Red — Important, warnings, errors
- Green — Examples, growth, success
- Yellow — Highlights, attention
- Purple — Categories, concepts
- Gray — Notes, shadows, less important
Custom Colors
Tap the color wheel to access unlimited custom colors and create your own palette.
Stick to 2-4 colors per diagram to avoid visual clutter. Too many colors can be distracting rather than helpful!
What to Draw in Handwritten Notes
Diagrams
Visual representations of concepts, systems, or processes.
Examples:
- Biology: Cell diagrams, body systems, food webs
- Chemistry: Molecular structures, reaction pathways
- Physics: Force diagrams, circuit diagrams
- History: Timelines, cause-and-effect chains
- Literature: Plot structures, character relationships
Mind Maps
Branching visual summaries that show relationships between ideas.
Structure:
- Main concept in the center
- Major branches for key topics
- Smaller branches for details
- Use colors to differentiate themes
Flow Charts
Step-by-step processes or decision trees.
Best for:
- Algorithms
- Scientific processes
- Historical sequences of events
- Problem-solving steps
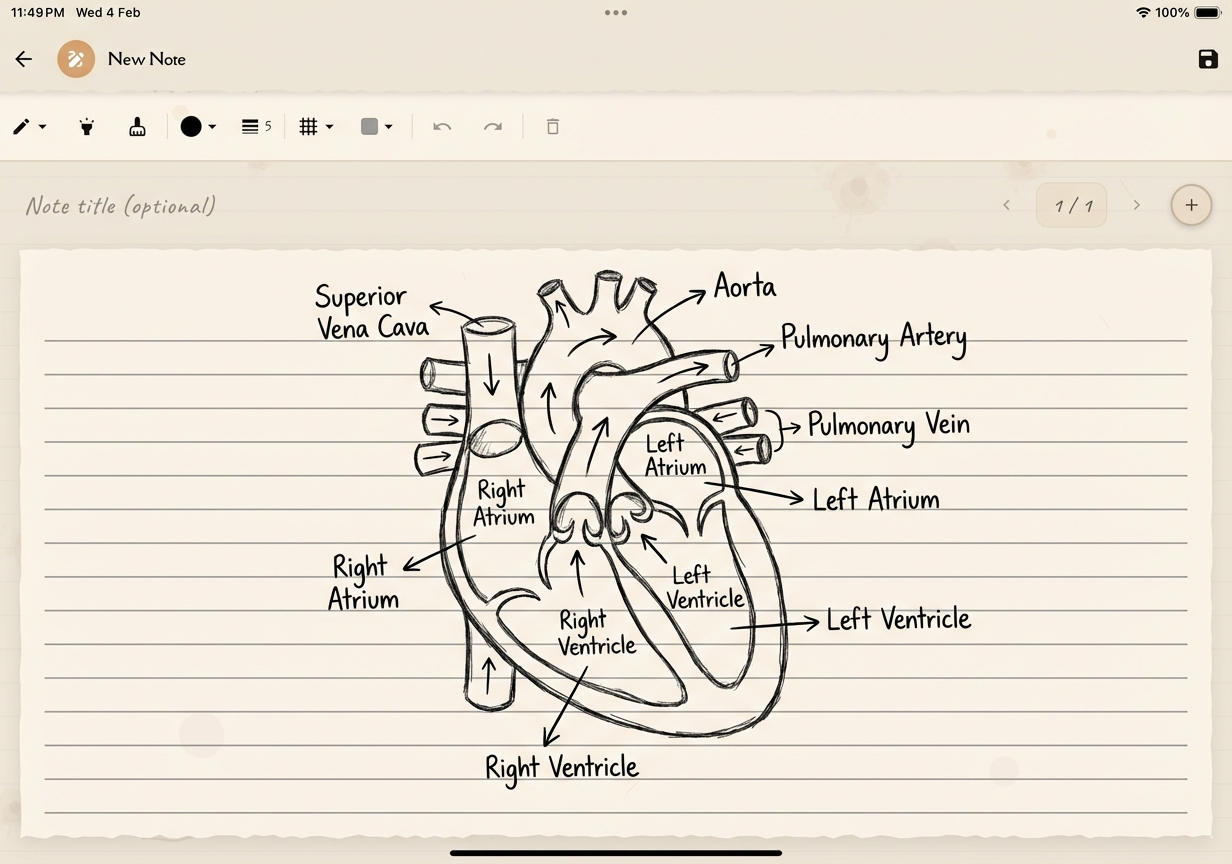
Annotated Sketches
Quick drawings with labels and notes.
Examples:
- Sketch a heart and label the chambers
- Draw a plant and mark where photosynthesis occurs
- Illustrate a math problem with visual representations
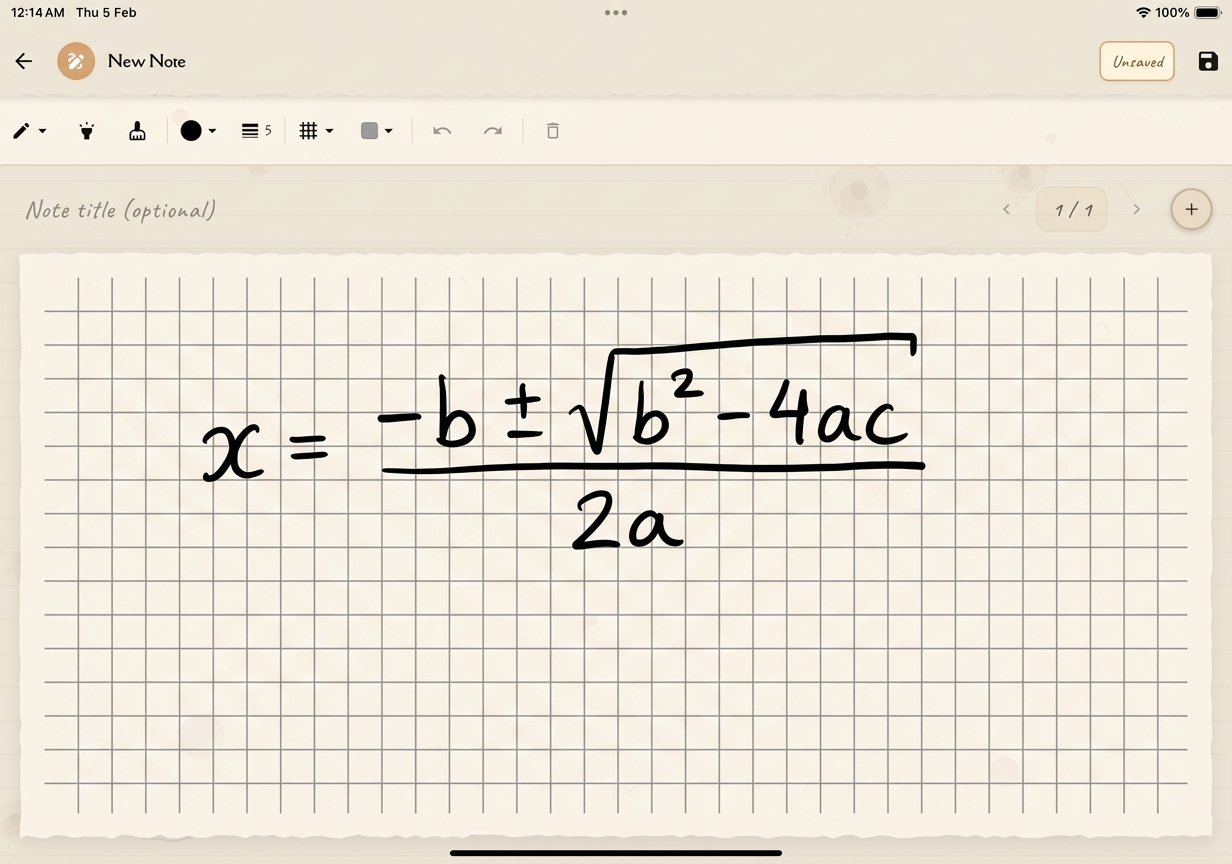
Mathematical Equations
Write complex equations, formulas, and calculations.
Benefits over typing:
- Easier to write fractions, exponents, and symbols
- More natural to show work step-by-step
- Can include graphs and visual representations
Visual Mnemonics
Draw memory aids and creative associations.
Examples:
- Draw pictures that represent concepts
- Create visual acronyms
- Sketch silly scenes that help you remember facts
Concept Sketches
Rough visualizations of abstract ideas.
Use for:
- Making abstract concepts concrete
- Testing your understanding by drawing it
- Creating visual anchors for memory
You don't need to be a good artist! Stick figures, simple shapes, and rough sketches work just as well for learning. The act of creating visuals is what matters, not artistic quality.
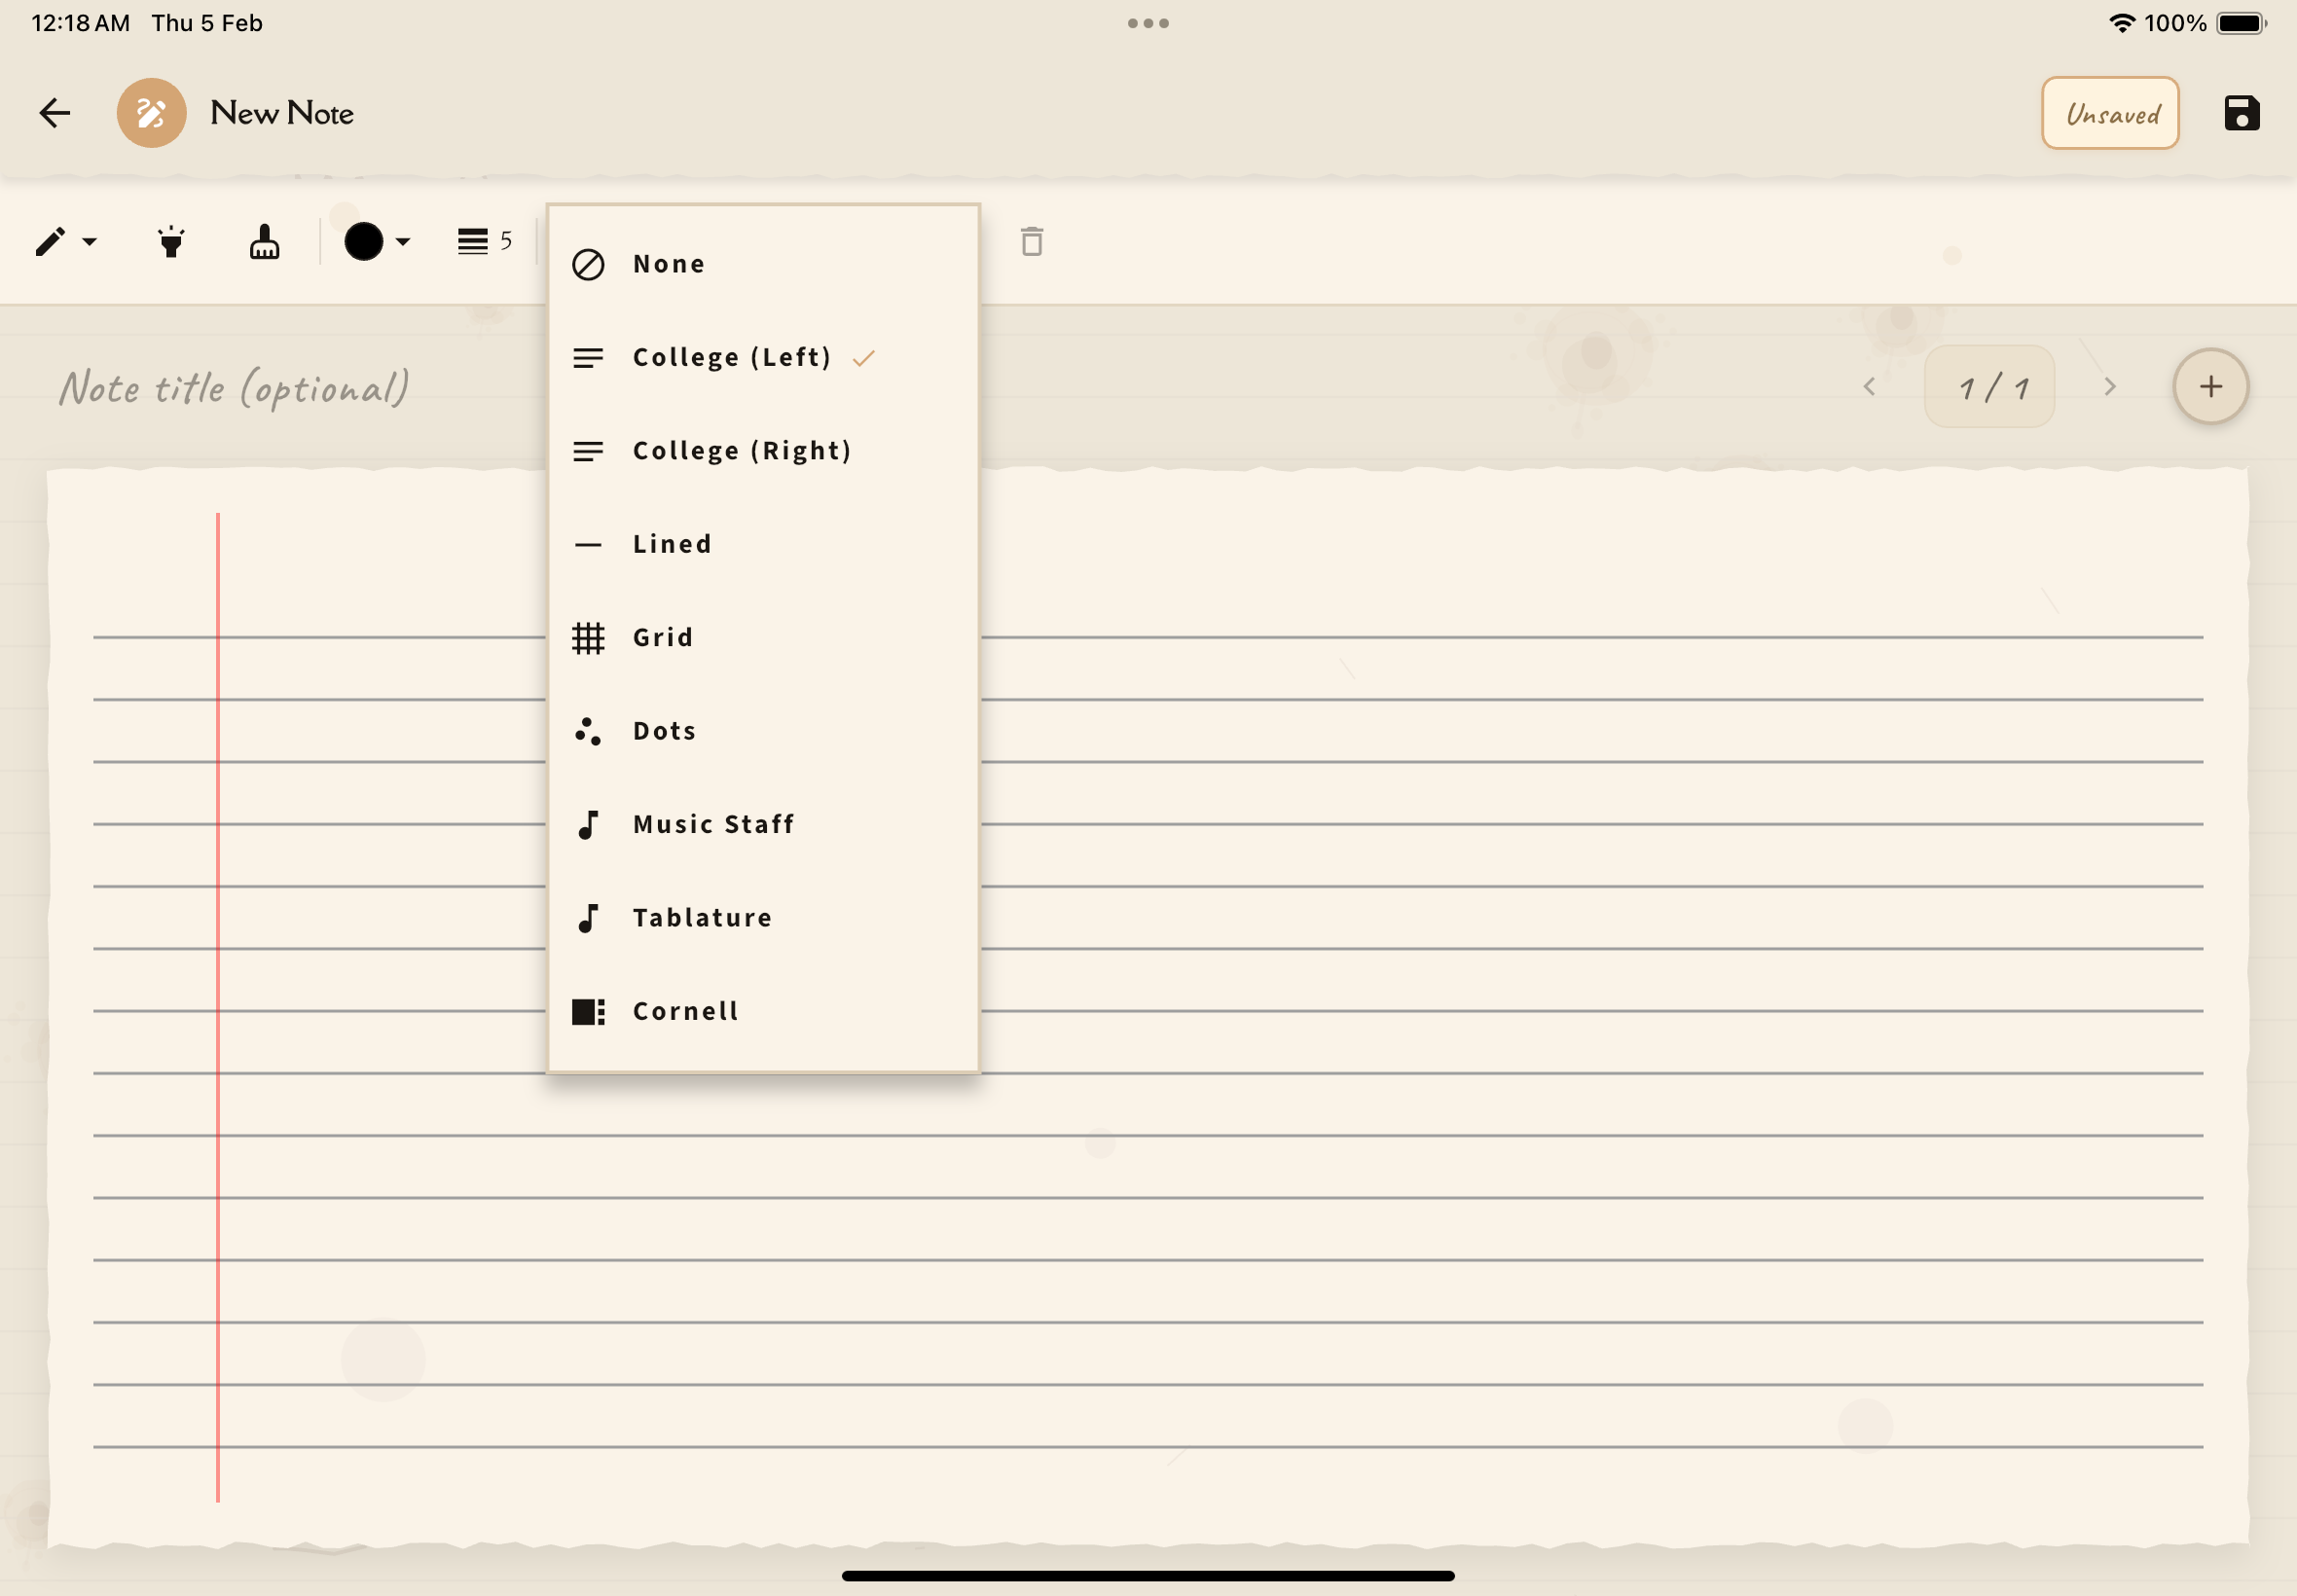
Background Templates
Choose from various background patterns to help structure your notes:
- Blank — Clean canvas for freeform drawing (default)
- Lined — Horizontal lines for neat writing
- College Ruled (LTR) — Lines with left margin for structured notes
- College Ruled (RTL) — Lines with right margin for RTL languages (Hebrew, Arabic)
- Grid — Horizontal and vertical grid for graphs and technical diagrams
- Dots — Dot grid for flexible layouts and bullet journaling
- Music Staffs — 5-line staff for musical notation
- Tablature — 6-line tab for guitar/bass notation
- Cornell — Cornell note-taking format with sections
You can customize the background color for each page to match your preference.
Editing Existing Handwritten Notes
To edit a handwritten note:
From your Annotations List, tap on the handwritten note you want to edit.
Tap the "Edit" button to reopen the drawing canvas.
Add more drawings, erase mistakes, adjust colors, or refine your work.
Tap "Save" to update the note.
Export Options
Handwritten notes can be:
- Exported as images (PNG, JPG)
- Converted to PDF for sharing or printing
Tips for Effective Handwritten Notes
Use Arrows and Connectors
Show relationships, flows, and sequences with arrows.
Add Annotations
Label everything clearly so you can understand your diagram later.
Use Space Strategically
Don't cram everything together. White space makes diagrams clearer.
Mix Text and Images
Combine written explanations with visual elements for multi-modal learning.
Start Rough, Refine Later
Your first sketch can be messy—that's part of thinking! You can always redraw it neatly afterward.
Review and Update
Come back to diagrams as your understanding deepens and add new details or corrections.
The goal of handwritten notes isn't to create museum-quality art—it's to engage your brain through motor activity and visual thinking. Messy diagrams that help you understand are more valuable than perfect drawings that you copied without thinking!
Next Steps
Want to add typed explanations? Use the Typed Note Editor. Prefer explaining out loud? Try the Voice Note Recorder for audio annotations.